AI Agent
Overview
The AI Agent module is LoyJoy's new component for building AI-driven conversational experiences. It allows an AI to understand user intent and use a set of tools to respond to requests and complete tasks. The agent can operate iteratively, meaning it can call multiple tools in sequence (e.g., search a knowledge base, then read a full document, then search the web) before formulating a final answer for the user.
This module replaces the older AI Gateway, AI Knowledge, AI Prompt, AI Smalltalk and AI Recommender modules. It combines the functionality of all those modules into a single, more capable module. If your existing chats use the old modules, we recommend migrating them to the new AI Agent module.
Key Concepts
The AI Agent module is built on two core components:
- Instructions (Prompts): This is where you define the AI's rules and persona. You configure its behavior and provide it with the necessary context to do its job.
- Tools: These are the actions the AI agent can perform. You give the agent a set of capabilities (like searching knowledge or running a process), and it will intelligently decide which one to use—or which combination of tools to use—based on the user's query.
How to Set Up Your AI Agent
Configuring your agent is a step-by-step process.
1. Add the Module
Start by adding the "AI Agent" module to your process. This single module will handle the conversational experience.
2. Select an AI Model
Choose the underlying Large Language Model (LLM) that will power your agent. LoyJoy offers a wide selection, including models from Azure, OpenAI, Anthropic, Mistral, and more.
A good starting point is Azure GPT-4.1 Mini, which offers an excellent balance of speed and power.
3. Configure Instructions (Prompts)
You define your agent's behavior using two types of instructions:
-
Pre-defined Instructions: These are system-provided settings like
Name,Role,Personality,Language Handling, andGuard Rails. You can pick and choose from the available options (e.g., select "Joyful" forPersonality), but you cannot edit the text of the instructions themselves. TheNameinstruction defines how the agent introduces itself (default: "You are the helpful assistant of [your company].");Guard Railsis seeded with a single combined preset that covers hallucination prevention, jailbreak resistance, prompt-leak protection, and the stop condition. -
Custom Instructions: To add your own free-text rules, you must add the "Custom" instruction type. This will give you a text field where you can provide any specific information the AI needs, such as:
- A description of your company.
- Specific rules on how to answer certain questions.
- Logic for iterative tool use (e.g., "First, try to find the answer using the 'Internal Knowledge' tool. If the information is not present, then use the 'Web Search' tool.").
Note: While there is no character limit for custom instructions, they should be as short and concise as possible for the best performance.
4. Add and Configure Tools
This is where you give your agent its capabilities. When adding a tool, keep these critical points in mind:
- Unique Name: Each tool you add must have a unique name. You cannot have two tools with the exact same name. You can leave the default name when adding a tool, but if you add multiple tools of the same type (e.g., two
Knowledge Searchtools), you must change at least one name to be unique. - Name and Description: The AI only sees the tool's Name and Description to understand what it does. Make these as clear and descriptive as possible. For example, instead of just "Knowledge Search," use a name like "Car Insurance Knowledge" and a description like "Searches the car insurance knowledge base for terms, conditions, and prices."
- Usage Logic: The AI can use multiple tools to answer a single query. If a tool requires complex logic (e.g., "Only use the 'Discount' tool if the user is a registered customer and mentions 'coupon'") or you want to define a specific order of operations (e.g., "Always try Tool A first, and only use Tool B if Tool A finds no results"), this logic must be defined in a Custom Instruction.
You can add multiple instances of the same type of tool, as long as each has a unique name. For example:
- Tool 1 Name:
car_insurance_knowledge - Tool 2 Name:
liability_insurance_knowledge
Note: You can add as many tools as you need, but for optimal performance, we recommend keeping the number below 30.
5. Configure the Settings Popover
Click the gear icon in the module toolbar to open the settings popover. Here you can configure:
- Show/hide AI label: Enable or disable the label shown below AI answers (e.g. "AI-generated").
- AI label text and URL: Edit the label text per language. Optionally enter a URL, which turns the label into a clickable link that opens in a new tab.
- AI agent status messages: Show or hide the status messages the agent uses to signal tool calls, such as "Searching for information..." or "Calling tool...".
Phone-Agent voice settings
For Phone Agents, the module additionally offers voice settings for the speech-to-speech conversation.
Voice model
Select the voice model that converts speech to speech. The default is the Azure Voice Live model azure-voicelive-realtime-1.5. Voice live models enable natural, real-time conversations and unlock the turn detection settings below.
Turn detection
With a voice live model, the module shows a Turn detection card. It controls how the agent recognizes when the caller has finished speaking (a "turn") and when to respond. Configure it to make interruptions, pauses and sentence ends feel natural:
- Turn detection type: How the end of a turn is detected:
Azure Semantic VAD,Azure Semantic VAD (multilingual),Semantic VADorServer VAD. Empty parameters use the Azure defaults. - Interruption behavior: How eagerly the agent responds to a caller who interrupts (Auto, Low, Medium, High). Available for Semantic VAD.
- Languages: The languages the turn detection listens for (Azure Semantic VAD). Enter language codes such as
deoren. - Prefix padding (ms): Audio sent before the start of speech.
- Silence duration (ms): Silence after which the end of speech is detected.
- Speech duration (ms): Minimum speech duration that must be detected.
- Threshold: Activation threshold for voice activity detection (0 to 1).
- Remove filler words: Removes filler words such as "um" and "ah" from the detected speech (Azure Semantic VAD).
- EOU model: End-of-utterance detection, which recognizes natural speaking pauses and reduces premature end-of-turn signals. Select a
semantic_detection_v1model or disable it. - EOU threshold level: Detection threshold of the end-of-utterance model. The lower the setting, the more likely a sentence is recognized as complete.
- EOU timeout (ms): Maximum time the agent waits for further speech from the caller.
Available Tools
Here is a list of the tools you can add to your AI Agent:
Search & knowledge
Azure AI Search
The Azure AI Search tool allows the agent to search your Azure AI Search indexes for information. This allows your agent to retrieve information from any data source in Azure such as SharePoint. The agent calls this tool with a search query, and the tool returns relevant results from your Azure AI Search indexes. After receiving the results, the agent can use the results to answer the user's question or perform a task.
See this guide for how to set up Azure AI Search and connect it to your agent.
Knowledge Search
This tool connects your agent to your LoyJoy Knowledge Database.
- How it works: Add the tool and select the specific knowledge folder or sources it should be able to search. Remember to give it a descriptive name that clarifies what knowledge it contains.
Product Search
This tool connects the agent to your LoyJoy Product Database, allowing it to find products that match a user's request.
- How it works: The agent will search the database for relevant products. By default, it will present its findings as text.
- Important: To show products as rich, interactive cards in the chat, you must use this tool in conjunction with the Product Display tool.
The product search works by generating an SQL query on the product database. See this page for SQL query examples in case you want to give examples for specific queries.
Web Search
This tool allows the agent to search the internet to answer questions outside of its knowledge base.
- How it works:
- The agent's search query is sent to a web search engine (Tavily) and the top results are returned to the agent.
- Configuration: You can optionally restrict the web search to specific domains (e.g.,
your-company.com).
Web fetch
This tool allows the agent to retrieve the content of a single, specific web page by URL.
- How it works: The agent calls this tool when it already knows the exact page to read, for example from a user-provided link or a result found via
Web Search. - Difference to Web Search:
Web Searchfinds relevant pages across the internet for a search query.Web fetchdoes not search; it reads one known page so the agent can use its content in the answer.
If you have a specific site you want to fetch, tell the AI in your prompt in which cases the AI should fetch its content and reference this tool.
Files
File read
This tool reads the full content of one knowledge-base file as Markdown.
- How it works: After selecting a file (via
Files listorFiles search), the agent reads the full content and uses it to answer. - How to use: In custom instructions, define an order like: "First use Files search, then File read on best match, then answer with source-grounded summary".
Files list
This tool returns a list of files from your knowledge base.
- How it works: The agent calls this tool first to discover available file names before reading content.
Files search
This tool searches file names in your knowledge base for a search term.
- How it works: The agent can filter large file collections to find likely candidates before opening a file.
- How to use: Prefer this tool when many files exist and the user asks for a specific topic (for example cancellation, pricing, coverage, or contract terms).
Recommended file-tool flow
- Use
Files listto discover available documents (good for a small list of documents) orFiles searchto narrow candidates for the user question (good for a large list of documents). - Use
File readto read the best matching file(s).
Note: The agent needs one tool to find files (Files list or Files search) and one tool to read the file (File read).
The main application for the file tools is to be able to read complete files instead of parts of files. This is especially useful for large documents that are not suitable for embedding in the knowledge base, such as contracts or terms of service (mainly because of their internal complexity). Other content like FAQs or websites is better suited for the knowledge search tool, as it can be embedded and searched more efficiently.
User files get
This tool allows the agent to access files that the user has uploaded during the conversation. Text is extracted from these files and can be read by the agent. Up to 100,000 characters are presented as a whole, the agent can also request further pages after this cutoff. Available file types are PDF, TXT, DOCX, PPTX. Currently, the file upload button in the chat has to be enabled in branding settings.
- How to use with file tools:
- Use
User files getfor files uploaded directly in the current chat. - Use
Files list,Files search, andFile readfor files from your configured knowledge base. - In custom instructions, define when to prefer one source over the other (for example: "Use uploaded files first when the user refers to 'my document'.").
- Use
Products
Product Display
This tool works with Product Search to display products as graphical cards in the chat.
- How it works: Add this tool to your agent alongside a
Product Searchtool. When the agent finds and decides to recommend products, it can use this tool to display them in a user-friendly, visual format. This is achieved by calling theProduct Displaytool with a list of product IDs or reference_ids so make sure that theProduct Searchtool you are using returns those fields. An example product search query would beSELECT title, description, id FROM products WHERE color = "red" AND size = "M".
Product Variants
Allows the agent to query the product database for different variants given a set of restrictions. To be used for complex cases where products have multiple attributes (e.g., color, size, material) and you want the agent to offer specific variants based on user preferences. Only to be used in combination with the Product Search tool.
Communication
Rich Message
Allows the agent to display rich messages, such as images, product cards, or lists in the chat. Without this tool, the agent can only respond with plain text. The difference to the Product Display tool is that this tool can be used for any rich content, not just products - especially if you are not using the product database which is required for the product tools.
- How to use: Simply add this tool to your agent and select which rich message types it can use. The agent will then decide when to use rich messages in its responses. You should adjust the tool's name and description to explain what types of rich messages it can use (e.g., "display_image: This tool allows the agent to display an image with an optional caption.").
Note: To use images with this tool, you must host the images somewhere accessible (e.g., your company website or an image hosting service) and provide the agent with the URLs.
Send Email
This tool allows the agent to send a plain-text email to a specified recipient. It is a lightweight option for forwarding user requests from an AI chat — for example, routing inquiries to a support address.
Sender: All emails are sent from LoyJoy. SMTP settings cannot be changed.
Recipient and subject: These can be defined in the agent's instructions or determined dynamically based on the user's input.
Example instruction:
"For inquiries about topic XYZ, send an email to support@loyjoy.com with the user's topic. Use the 'mail' tool for this."
Conversation control
Leave AI Agent
This tool allows to leave the AI Agent module and proceed with the next step of the process. This is useful when placing the AI Agent process module on the main part of the process, i.e. not behind the Message Start Event, and activating that the process should wait in the AI Agent process module for further customer questions. In this scenario such a tool call to leave the AI Agent is needed to proceed in the process flow.
Typically the tool could be configured with a tool description Call if the customer wants to leave the AI agent, maybe with the extension ... and wants to rate if the customer problem is solved.
If your process type is a phone agent, additional tools from categories like CONVERSATION_CONTROL and COMMUNICATION can be available (for example Hangup or Transfer).
Phone-Agent only: Each tool has an optional "Play keyboard sound when using tool call" setting. When enabled, callers hear a subtle keyboard sound while the tool is running, giving audible feedback during the pause instead of silence. The sound is played only once per call.
Tasks & memories
Create Memory
This tool stores a piece of memory in the short-term memory so the agent can remember important details during the conversation.
List Memories
This tool retrieves all memories from short-term memory so the agent can use previously stored details in later responses.
Use these tools for long-running conversations where the agent needs to retain context across multiple interactions.
Data & variables
Set Variables
The set variables tool allows the agent to set variables with pre-defined names in the process. This can be useful for various reasons, such as keeping track of user preferences, storing intermediate results, or controlling the flow of the conversation based on certain conditions.
To use the set variable tool, simply add it to your agent and specify the
variables names that the agent can set. The agent will then be able to update
these variables during the conversation as needed. To clarify to the agent what
each variable is for, add a custom instruction with a description of each
variable (e.g., "Use the variable preferred_product to store the user's
preferred product when they mention it."). You can add as many variables as you
need, there is no limit. The agent can then decide to set any or none of the
variables you have defined, depending on the conversation and your instructions.
See also this guide for more information on how to use variables in your processes.
The variables set by the agent with this tool are stored in the user's browser and are not shared across different chats (process-specific variables). If you want to use the variables after a process jump to another agent: Rewrite the variable value in the new agent with a Set Variable tool and select the same variable name, but select process independent storage.
Automation
Run Process
This tool gives the AI the ability to start another LoyJoy process.
- How it works: You link the tool to a specific process and give it a clear name and description (e.g.,
live_chat_handoff,begin_insurance_application). The AI will trigger this process when it deems it appropriate based on the user's request. - Capabilities: The
Run Processtool can start a process within the same chat agent or perform a "return jump" to another agent.
MCP Connection (Advanced)
This advanced functionality is fully available and allows your agent to connect directly to any external system that supports the Model Context Protocol (MCP).
- What it is: MCP is a native API standard for AI agents. If your external software (like a CRM) provides an MCP endpoint, you can connect it directly to your agent.
- How it works: Simply enter the MCP Server URL and API Key for the external service. The service will then explain its own capabilities to the AI, and the agent will decide when and how to use it.
The API key has to be a Bearer token and should be entered without the Bearer prefix, just the token itself.
How to Turn on / off Behavior After x Messages
You can change the behavior of the agent after a certain number of messages. This can be helpful if you e.g. want to offer a newsletter to people who ask more than two questions or similar.
To do this, you add a variable module after the AI agent module with the following settings:
- Variable name:
question_count - Source function:
increment - Parameter 1:
question_count - Parameter 2: 1
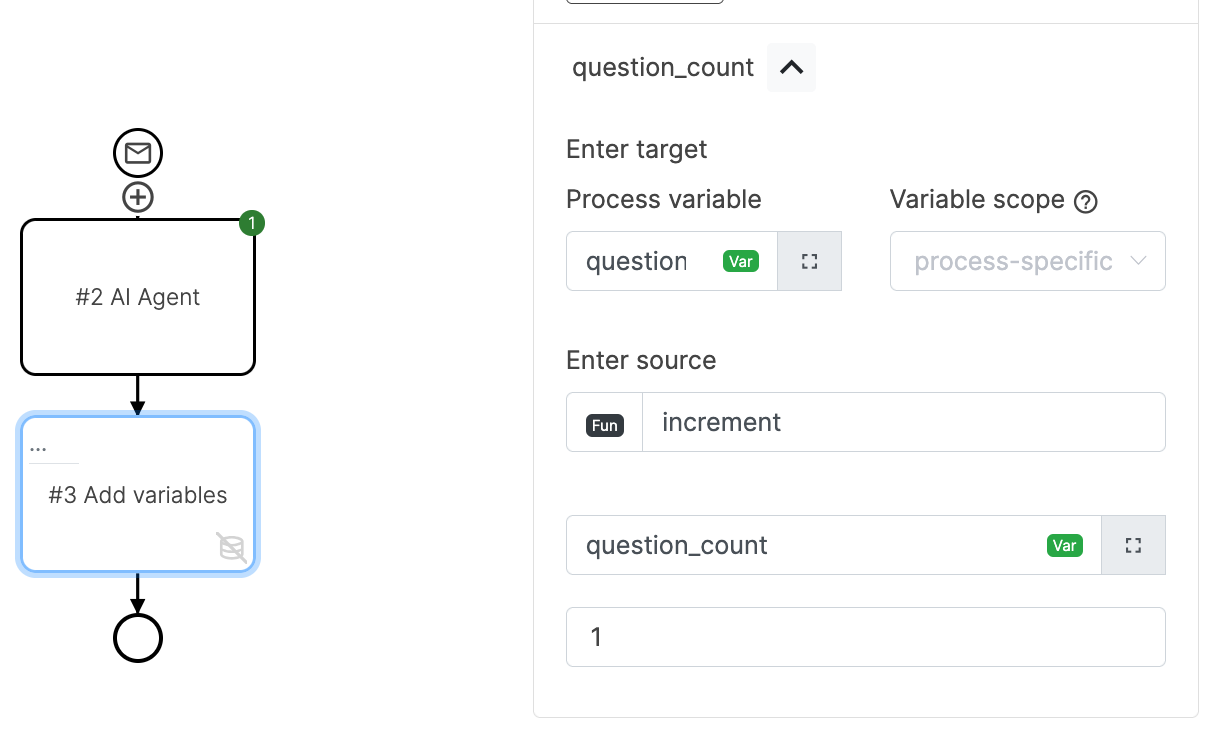
This variable module will count each question in the variable question_count.
You can then add a custom instruction to the AI agent module that is dependent
on the question_count variable. For example:
${question_count >= 2 ? "Important: The user has already asked 2 subsequent questions, so offer them the newsletter after answering their question." : ""}
This instruction uses a conditional expression to only give the relevant instruction to the agent once the required number of questions has been reached.
Mode: Stay in the AI agent module and wait for user inputs
This mode can be activated in the settings tab of the module. It allows you to place the AI agent module on the main part of the process, i.e. not behind the Message Start Event. When activated, the AI agent module will activate the user's input field and allow the user to ask questions, answering them until the Leave AI Agent tool is called.
Getting Started: Templates
To see the AI Agent in action, check out these templates in the LoyJoy Template Store:
- AI agent insurance demo: A pre-built example demonstrating
Knowledge Search(for two different products) andRun Process. - Product Finder Agentic AI: A template focused on using the
Product SearchandProduct Displaytools to create a product recommender.